It's not uncommon to be preparing to install some new flooring, only to find yourself faced with an uneven floor. Dips and bumps in a floor can be caused by many factors, but whatever the reason for their existence, one thing is certain: you won’t be able to install the flooring correctly until the uneven floor has been fixed.
The best and simplest way to do this is by applying a self-levelling compound. Whether you have an uneven bathroom floor, uneven floors in an old house or your garage floor is cracked and uneven, we have the solutions to help.
Why use a self-levelling compound for uneven subfloors?
A self-levelling compound is a polymer-modified cement solution that has high flow characteristics. It's applied prior to the flooring being installed and when applied correctly, creates a smooth surface for you to work on.
There are many types of self-levelling compounds available, all with different characteristics. It is crucial that you choose the right one for your application, and that you follow its particular set of instructions to ensure it is applied correctly.
Things to consider when using a self-levelling compound to fix uneven floors
Always remember that a 'smooth' floor isn't necessarily level, and a 'level' floor isn't necessarily smooth. The British Standards relevant to the flooring industry specify a “surface regularity” - this is a measurement of a floor's smoothness, not how level it is.
If slopes in the floor are particularly pronounced, you may need an alternative solution as most self-levelling compounds are designed to work at depths of 3mm-10mm, although some deep fill self-levelling compounds can be applied to depths of up to 50mm-60mm.
Other factors to consider include where the floor is located and what conditions it will experience over its lifetime, what floor covering is being installed, and how long you have to apply the self-levelling compound.
Whatever your needs, the key to choosing the right self-levelling compound is to assess the particular application and do your research.
Step-by-step: how to use a self-levelling compound when fixing uneven floors
Once you’ve selected the right self-levelling compound for you, it's important to understand how best to apply it. Whether you need to fix an uneven bathroom floor, uneven garage floor, or uneven kitchen floor, there are some simple steps you need to undertake.
Firstly, if the subfloor contains residual moisture with a reading of 75% RH or above, a liquid DPM should be used.
By choosing to use a floor primer, you will also enhance the bond between the self-levelling compound and the subfloor, and create a barrier to stop air escaping, which means the self-levelling compound can cure correctly.
To apply self-levelling compound to a floor, you will need the following equipment:
- An electric drill
- A mixing paddle
- A mixing bucket
- A trowel
- A spiked roller
- PPE
Steps:
- Prepare the area by vacuuming to ensure there is no dust, as this can cause adhesion issues
- If skirting boards can’t be removed, masking tape should be applied to protect the surface
- Add the appropriate amount of water to a suitably sized mixing bucket, and pour the powder into the water
- Mix using an electric drill and whisk for two minutes, ensuring that the compound is uniform in colour and consistency
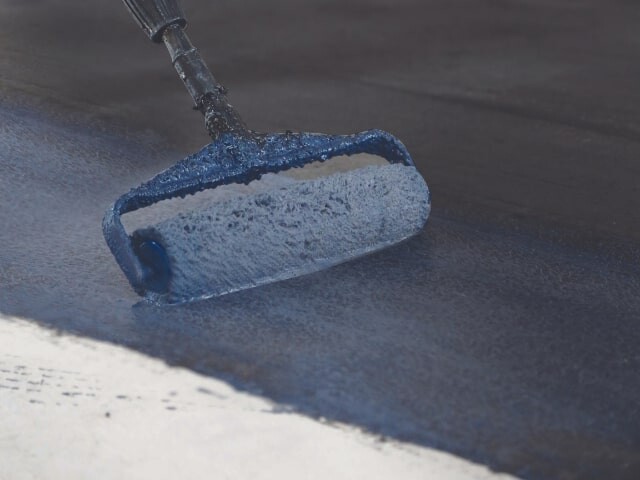
- Pour onto the prepared surface in a continuous motion, then spread using a steel trowel to the desired thickness. Work the self-levelling compound into the corners and ensure that there is good coverage
- A spiked roller can be used once the self-levelling compound has been applied. This removes trapped air bubbles to improve the overall finish. (If using a spiked roller, ensure that you do not drag the roller across the surface, but gently bring it back and forth). Note - we don't recommend the use of a spiked roller on fibre-reinforced compounds, as this will pull fibres to the surface.
- Once applied, the product must be left to dry for the recommended amount of time before it can be walked on and before a floor covering can be applied
Everything you need to know when fixing an uneven subfloor with self-levelling compound
Now that we’ve explained how to apply a self-levelling compound onto an uneven floor, discover some of the frequently asked questions around the topic.
Besides a visual inspection, there are many ways to identify an uneven floor, including the use of a beam level, phone apps, or even placing a golf ball or a marble down in the centre of the floor and seeing if it rolls. However, it's important to remember that the primary function of a self-levelling compound is to smooth imperfections in a floor so that a floor covering can be applied - it's not designed to dramatically change the levels of a floor.
Using a spiked roller is highly recommended. This will remove trapped air bubbles to improve the overall finish and create a smoother, sounder surface on which to lay the flooring. However, we don't recommend the use of a spiked roller on fibre-reinforced compounds, as this will pull fibres to the surface.
No. Always make sure that the self-levelling compound you use is within date, otherwise there is a risk it could fail. Furthermore, should the product fail to perform, it will not be guaranteed by the manufacturer, meaning you will be left to fix the problem.
The most likely causes of cracked self-levelling compound are poor bonding to the substrate below, and movement in the subfloor. Poor bonding to the substrate can often be rectified by the use of a floor primer, such as our Cempolay Universal Primer.
Bostik Cempolay Universal Primer
A water-based, solvent-free, acrylic dispersion floor primer and bonding agent that’s suitable for use prior to the application of any Bostik self-levelling compound.
When applied undiluted, it acts as a bonding agent on non-porous surfaces such as power floated concrete, ceramic tiles, quarry tiles, rigid metal, terrazzo, asphalt and surface membranes. In diluted form, Bostik Cempolay Universal Primer can be used as a primer on porous surfaces and will dry within one hour depending on the conditions.
Where this is a risk of movement in the subfloor, and you're concerned about a self-levelling compound cracking, the best solution is to use a fibre-reinforced self-levelling compound, such as our Cempolatex Fibreflex. This has been specially designed for use on floors where vibration and minimal thermal movement could be problematic.
Bostik Cempolatex Fibreflex
A one part, rapid setting, self levelling compound developed for use on subfloors where vibration and minimal thermal movement can be problematic.
Mix your self-levelling compound following the manufacturer's ratio guidelines precisely. Pour the mixture onto your prepared floor in a continuous motion, starting from the furthest corner and working towards your exit point.
Use a steel trowel or smoothing compound rake to spread the compound evenly, maintaining consistent pressure to achieve your desired thickness. Pay special attention to corners and edges where the compound might not flow as freely.
For larger areas, work in sections that you can complete within 20 minutes to prevent the compound from starting to set. Keep your tools clean between mixes and maintain a wet edge where sections meet to create seamless transitions between pours.
Screed and self-levelling compound serve different purposes in floor preparation. Traditional screed provides a robust, thick base layer, making it ideal for heavy-duty applications and areas requiring significant build-up.
Self-levelling compound offers precise surface correction at much thinner depths. This specialised solution flows naturally to create a smooth finish, perfect for preparing floors and to receive adhesive when installing coverings like vinyl, carpet, or tiles.
The application method also differs significantly. While screed requires manual spreading and leveling by skilled professionals, the self-levelling compound's advanced formula allows it to spread and settle naturally, reducing installation time and labour costs. In many projects, the two are used together - screed to build up depth and provide strength, and self-leveling compound to achieve a smooth and level finish before applying floor coverings. The choice between using one or both depends mainly on your project’s specific requirements, including the substrate condition, the depth needed, and the type of finish required.
When preparing to apply self-levelling compound, having the right set of tools ready will make your job much easier. An electric mixer ensures thorough blending of the compound, while a sturdy mixing bucket helps achieve perfect consistency.
For spreading the compound, you'll need both a steel trowel and a gauge rake - the trowel gives you precise control over thin areas, while the rake helps maintain even thickness across larger surfaces.
A spiked roller proves invaluable for removing trapped air bubbles and achieving a professional finish. Remember to wear protective equipment, including rubber gloves and safety goggles. For accurate depth control, a laser level or spirit level helps ensure your compound achieves the desired thickness throughout the area.
Related articles
Stay aware about our latest innovation and our latest news and sponsoring actions