RENO P520 EASY
BENEFITS
- Very low odour
- Quick and easy processing
- Slight mixing in the container
CHARACTERISTICS
- Color: Part A: transparent / Part B: brown
- Walk on time: 15min
- Curing time: 24h
APPLICATION
Pour component B into the bottle containing component A. After closing the bottle, shake component A vigorously for approx. 15 seconds. Insert screed wave connectors into the cross sections at a depth of up to 2/3 of the screed thickness. Pour homogeneously mixed resin from the bottle into the prepared crack and smooth it down with a spatula. Apply the repair resin to the substrate with a suitable toothed strip and immediately insert/join the parts to be bonded and press on well.
Easy mix crack repair resin with simple application
RENO P520 EASY functions as a crack repair resin using a practical bottle mixed resin system. Component B is poured into Component A and mixed directly within the bottle, creating a homogeneous mixture ready for application.
Key application benefits include:
- Quick and straightforward mixing process
- Controlled pouring directly into cracks
- Approximate working time of 10 minutes
This system supports efficient handling and reduces preparation time on site.
Additional bonding capabilities
In addition to crack and joint repair, the resin can also be used as a rapid hardening adhesive for bonding metallic profiles and accessories. This adds further versatility to the system, making it suitable for multiple site applications.
A practical solution for crack and joint repair
Combining the benefits of a screed crack repair resin, easy mix crack repair resin, and fast curing crack repair resin, RENO P520 EASY provides a dependable solution for repairing and preparing screeds prior to further flooring installation.

Application process: RENO P520 EASY
Quick Application Steps (On-Site Guide)
- Prepare: Ensure cracks/joints are clean, dry and free from dust
- Mix: Combine components by shaking bottle thoroughly (~15 seconds)
- Apply: Pour directly into cracks or joints until fully filled
- Finish: Smooth and broadcast with dry sand if required
- Wait: Walkable in ~30 minutes; ready for overcoating shortly after
1. Subfloor preparation
Proper preparation ensures effective crack repair:
- Substrate must be dry, solid and free from grease, dust or contaminants
- Remove weak surface layers, residues and coatings using mechanical methods
- Vacuum thoroughly to ensure a dust-free surface
- Dense or smooth substrates should be abraded and degreased
- Cracks >1 mm should be assessed and, if required, opened and cleaned prior to filling
- Joints must be cleared of debris and loose material before treatment
Substrates must meet site and application standards before repair begins.
2. Mixing
- Pour Component B into the bottle containing Component A
- Close and shake vigorously for approx. 15 seconds until fully blended
- The mixture will turn a uniform yellowish colour
- Working time: approximately 10 minutes
Important: The material reacts quickly and generates heat—mix only what can be used immediately.
3. Application
- Apply immediately after mixing by pouring directly into cracks or joints
- Ensure full penetration and filling of the repair area
- Smooth the surface using a spatula if required
- While still wet, broadcast with dry quartz sand to improve adhesion of subsequent layers
- Remove excess sand after curing before applying further products
- Can also be used for bonding metallic profiles and accessories
Designed for rapid crack repair and joint sealing in screeds.
4. Drying & curing
- Working time: ~10 minutes
- Walk-on time: ~30 minutes
- Full cure: ~45 minutes
Ensure stable temperature and avoid contamination during curing.
5. Underfloor heating
- Switch off heating systems 48 hours before, during, and for at least 48 hours after application
- Gradually recommission heating once curing is complete
Common mistakes to avoid
- Insufficient mixing (incomplete blending of components)
- Mixing too much material given short working time (~10 minutes)
- Applying onto damp or contaminated substrates
- Not preparing wider cracks before filling
- Skipping sand broadcasting where required for adhesion
- Leaving mixed material in container (risk of overheating due to exothermic reaction)
- Applying outside recommended temperature range (+15°C to +25°C)
Frequently Asked Questions
The brochure states that simple patching will not last for crack repair. It presents crack repair solutions as treatment in depth for cracks and construction joints, with precise filling and reliable reinforcement.
Crack repair systems are presented as solutions for repairing cracks and construction joints. The brochure states that they provide precise filling and reliable reinforcement, while the TDS describe P520 EASY and E742 STRUCTURE for crack repair and joint filling.
The crack repair sequence described in the TDS includes preparing the substrate, cleaning and vacuuming the crack or joint, filling with resin, broadcasting dry quartz sand onto the wet resin, allowing the product to cure, removing excess sand, and then carrying out the subsequent primer or levelling stage as required. Opening the crack is only stated when crack width or repair conditions require it.
Static cracks in screeds should be repaired using a resin such as RENO P520 EASY or RENO E742 STRUCTURE, followed by sand broadcasting to ensure adhesion. If reinforcement is required, a fiberglass mesh such as RENO U720 or U736 CONNECT can be applied in combination with repair mortars.
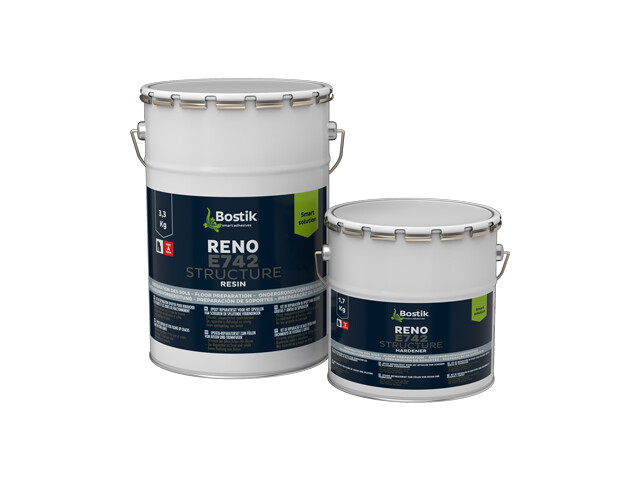
Cracks and joints should be cleaned and prepared, then filled using resin systems. RENO E742 STRUCTURE is designed for repairing construction joints, shrinkage joints and cracks before levelling. RENO P520 EASY provides a fast-setting solution for non-structural cracks and joint sealing. For reinforcement, RENO U736 CONNECT can be embedded into repair mortar or resin to bridge cracks.
The substrate must be sound, dry, and clean. Static cracks should be repaired using a suitable resin system such as RENO P520 EASY or RENO E742 STRUCTURE. Depending on substrate type, priming may be required before applying levelling compounds or repair mortars.
Walk-on time depends on the product. RENO P520 EASY is walkable after about 30 minutes. RENO C920 ST is walkable after about 30 minutes. RENO C950 QUICK is walkable after about 45 minutes. RENO G905 ALPHA ST is walkable after about 2 to 3 hours.
Static cracks and joints can be repaired with resin systems such as RENO P520 EASY or RENO E742 STRUCTURE. The TDS states that P520 EASY is for rapid repair of non-structural cracks and joint sealing, while E742 STRUCTURE is for repairing cracks and filling joints in reinforced concrete and sand/cement screeds, and for consolidating weak upper layers. After filling, dry quartz sand is broadcast onto the wet resin to improve bonding before subsequent levelling or adhesive application.
Subfloors must be clean, dry, sound and free from contaminants such as dust, grease or old adhesive residues before application. Mechanical preparation such as grinding, brushing or vacuuming is required. After preparation, cracks should be repaired using resin systems like RENO P520 EASY or RENO E742 STRUCTURE, followed by smoothing or levelling using suitable repair mortars.
Cracks are repaired by filling them with resin after proper preparation. Clean and open cracks if required, fill with resin such as RENO P520 EASY or RENO E742 STRUCTURE, then sprinkle quartz sand onto the wet resin to improve adhesion of subsequent layers.
RENO P520 EASY is a solvent-free 2-component silicate resin for rapid repair of non-structural cracks and joint sealing, with a walk-on time of about 30 minutes and a curing time of about 45 minutes. RENO E742 STRUCTURE is a 2-component solvent-free epoxy for repairing cracks and filling joints in reinforced concrete and sand/cement screeds, and it can also be used to consolidate weak upper layers of the substrate, with a curing time of about 24 hours. P520 EASY is the faster setting option, while E742 STRUCTURE also covers substrate consolidation.
Drying time depends on the product used. RENO P520 EASY is walkable after about 30 minutes and cures in about 45 minutes. RENO E742 STRUCTURE cures in about 24 hours. RENO C950 QUICK is walkable after about 45 minutes, with floor covering possible within hours depending on the finish.